DIY mic calibration
[Please note: the method below is the pain-staking manual way. A somewhat simpler method is described, in effect, in How to make a 90 degree calibration file.]
If you have an uncalibrated mic that you want to calibrate, the procedure below may help. Please note that I do not recommend that you purchase an uncalibrated mic and attempt to “calibrate” it this way, as it took me about three hours to do this – and that’s just one angle! If buying a new mic, just get one of these.
To do this, you need to have a calibrated mic as a reference. If you don’t have one and can’t borrow one, stop now.
The basic principle is simple: compare an uncalibrated mic against a reference (calibrated) mic, and use the difference to generate (by hand) a calibration file for the target mic. As noted above, this is very time-consuming, and not recommended, almost all of the time.
1. Run a sweep of the reference mic on a woofer. Position the mic quite close to the woofer e.g. 10 or 20 cm. Then run a sweep of the target mic with the mic in the exact same position (use a rule or tape measure).
2. Adjust the reference sweep in your measurement program so that the two mics read the same at 1 kHz.
3. Compare the two sweeps, and at a range of frequencies, note the difference between the reference and the target mic in dB. If the target mic is lower, the number is negative; if higher, the number is positive. You should do this in a .txt file, with the format freq, dB. (See below for a full example). Do this for a reasonable range that the woofer covers.
4. Load the resulting file into your measurement program, and run another sweep with the target mic. If the result isn’t close enough to the reference, adjust the numbers in the calibration file, re-load the calibration file, and run another sweep to check.
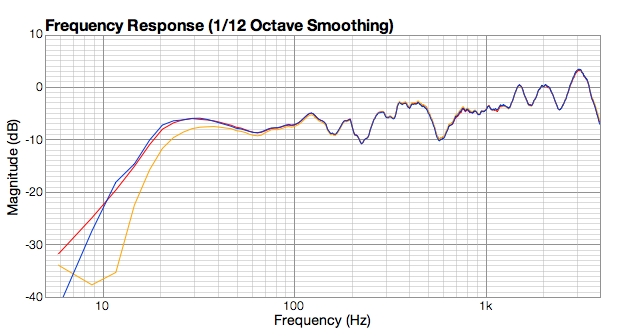
The figure below shows the measurements from doing this, where red is the reference mic, orange is the target mic without calibration, and blue is the target mic after calibration.

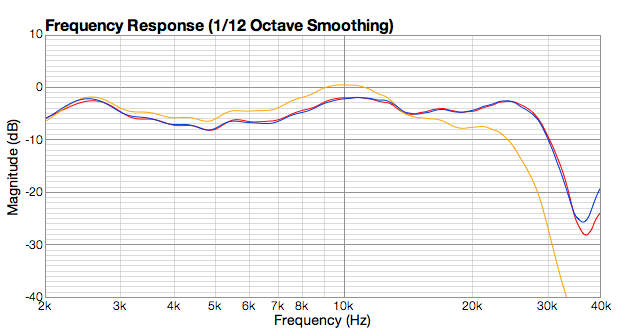
Then repeat steps 1-4, modifying the same file, but with a tweeter and over an appropriate frequency range. The figure below shows the results with a tweeter, from 2 to 40 kHz (the “calibration” was done up to 30 kHz). This measurement can be gated.
 This is what the calibration file looks like, for this particular mic:
5.6, -16
8.8, -14.5
11.7, -7.2
14.6, -5.7
20, -3.7
30, -1.9
40, -1
60, -0.5
200, -0.2
1000, 0
2500, 0
3000, 0.4
4000, 1
5000, 1.6
6000, 2.2
10000, 2.7
12000, 1.3
13500, 0
16000, -1.2
18000, -2.8
20000, -3.1
22000, -4.2
24000, -6.8
30000, -16
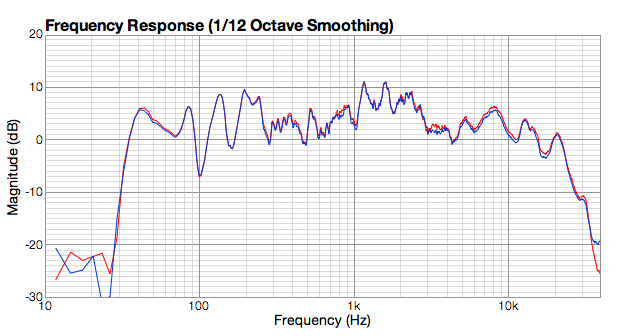
The “acid test” is an in-room measurement. Here is a measurement using the reference mic (in red) versus the target mic (blue):

(This particular speaker drops like a stone below 40 Hz as it is a passive radiator – anything much below 30 Hz is just noise.)
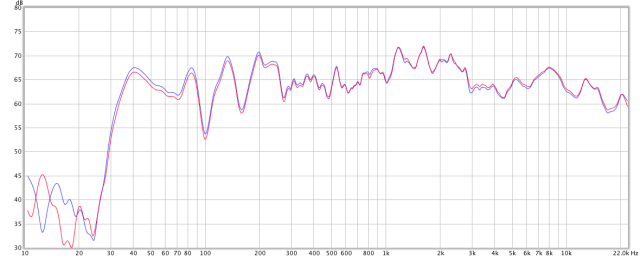
Fortunately, REW agrees:

Summary: it can be done if needed, although it’s not very cost/time-effective.